Thursday 27 December 2018

Senseless Fun with Probes


 A probe can be as simple as a nail, a spring and a length of copper wire.  I had some unused items in the shop which led to a bit of overkill.  The large metal thing in the photo is an old PC power supply.  Over to the left is a board to read pulses from a photo interrupter.  In the centre is a dial indicator with a metal tang screwed to the top of the plunger.  This tang breaks the beam of a photo interrupter whenever the plunger is forced upwards.  The dial indicator is handy for quickly finding high/low spots in a sheet of material.  For actual probing the nail and spring mentioned earlier would serve the same function.

 This is the bowed wood that was probed.  The shiny bit is a quarter to give a sense of scale.  A size for the engraving and a centre origin point were decided on at this time,  the origin point was marked with a felt pen.  The  reason for marking the origin will become clear in the next step.  To probe a grid of points smartprobe.ngc was used,  this is included with the Linuxcnc package.  The probe work piece coordinates were zeroed at the the centre of the material.  Z zero is set to the photo interrupter trigger position at this origin which is also the high point of the material. 

The text file created looks like this:
-3.000000 -2.750000 -0.404709
-2.800000 -2.750000 -0.346447
-2.600000 -2.750000 -0.292887
-2.400000 -2.750000 -0.244701
-2.200000 -2.750000 -0.201554
etc etc etc.  It's pretty dull reading but it can be put  to use or at least something resembling a use.  It's time to visit ScorchWorks.
http://www.scorchworks.com/
The 2 Scorch programs used in this post are F-engrave and G-Code-Ripper.


The smiley moon started as an SVG from OpenClipart.  F-engrave needed a DXF file so InkScape was used for the file conversion.  I won't go into how the g-code file was created in F-engrave except to say it's about as simple as this type of software gets.  The critical point is the origin and scale are the same as the grid probe file.


With a probe text file and an engraving g-code finished it's time for G-Code-Ripper.

A: open g-code file
B: open probe text file
C: save the adjusted file

That's it.


Remember the felt pen mark made earlier ?  That's where the cutter was touched off for the engraving work piece coordinates.  It was done this way because the probe wasn't in the spindle or even near it.

Anyone tempted to try this is advised to go to YouTube where there are several examples.  The software has a clever probe function which wasn't used in this post

Wednesday 26 December 2018

Easy Examples of Cutter Compensation

A description of my methods:
> G54 work piece offsets are used
> Tool table edits are done manually, don't forget to reload.
> Programmed to part drawing,  full radius compensation
> Linuxcnc with Axis GUI
> No tool changes so the D word will be used to read the tool table
    * using D word won't update the tool displayed in Axis.
       MDI a tool change if this is a distraction.
> No tool length (G43) offsets
> No G41.1 or G42.1, something about old dogs and new tricks   
> Cutting inches on a machine configured in inches.
> Ideal stock, no large amounts of excess stock, no obstacles.
> Running the programs in single-block simulation is the best and safest way to
   get a grasp of the concepts.

Outside cut
(1/2" end mill)
N1 G20 G17 G40 G49 G90
N2 G54
N3 G0 X-.75 Y-.75 Z1
N4 Z-.1
N5 G01 G41 x0 y0 D01 F60
N6 Y3
N7 X3
N8 Y0
N9 X0
N10 G40 X-.75 y-.75
N11 Z1
N12 M02

Outside cut description
N1 setting inches, XY plane, absolute positioning, cancelling tool length and   
      cutter comp
N2 read work piece coordinates
N3 get ready to approach, this needs to be a cutter radius or more away from
      intended start of the cut
N5 approach and enable cutter comp, D01 calls tool table
N6 start profile
N9 finished profile
N10 cancel comp with a lead-out 

Inside cut
 (1/2" end mill)
N1 G20 G40 G17 G49
N2 G54
N3 F30
N4 G00 x2 Y0 Z.5
N5 G41 X2.5 Y1 D01
N6 G1 Y2 Z-.1
N7 G3 X1.5 Y3 I-1
N8 G1 X0
N9 Y0
N10 X3
N11 Y3
N12 X1.5
N13 G3 X.5 Y2 J-1
N14 G1 G40 x1 Y1.5
N15 Z.5
N16 G0 X2 Y0
N17 M02

Inside cut description
N1  A safety block in case something unexpected is active.
N2  G54 is probably already active, better safe than sorry.
N4  Setting up for approach.
N5  Approach and kick-in comp, must travel at least one cutter radius, this is
       the  lead-in move.
       Look at the coordinate readout after the lead-in to see how G41 altered the
       path. Looking isn't necessary but may clarify the concept.
N6  A bit of a down ramp for the cutter.
N7  An arc to ease into the profile, (G3 or G2 can be used now as comp has been applied at N5)
N8  Starting the profile.
N12 Profile complete.
N13 Arcing away from the profile, can not be used as a comp cancel.
N14 Lead-out here while shutting off comp. (G2/G3 can't be a lead-out move)
N15 With lead-out complete the z will retract straight up.
N16 Go back where we started, this is optional.


An example from Linuxcnc Documentation
(1/2" end mill)
(this is crafty , maybe too clever if looking for a basic example)
G20
F30
G10 L1 P1 R.25 Z1  (alters the tool table)
T1 M6  
G00 Z0
G41 (call comp)
X4 Y3 (lead-in from tool change position, comp alters path)
G1 X5 Z-1  (ramping to Z depth)
G3 X6 Y4 J1 (arcing into contour)
G1 Y6  (contour starts)
X2
Y2
X6
Y4     (contour ends)
G3 X5 Y5 I-1   (arcing out of contour)
G0 Z0  (straight up, comp still active)
G40 (cancel comp)
G0 X1 Y1 (the lead-out, comp alters path)
T0 M6 (back to tool change position)
M2

A screen shot of Axis.  White is the outside example,  red is the inside example.
The gap between the red and white lines is 1/2",  the diameter of the cutter.

Pictures or it didn't happen.  The black is the outside example,  the arrows are the inside example.  Between the cuts in the top left area some remaining uncut material can be seen.  This should appear in all 4 corners but this is cheap plywood and the cutter was dull.

That's all for now.  Be aware there are lot's of potential gotcha's with G41/G42 due to 'look ahead' and gouging.  Linuxcnc is really anal on the gouging part,  that's a good thing I suppose.
  

Thursday 6 December 2018

Painting carvings

Finishing carved items with varnish or poly looks good in wood but sometimes you don't want the finished work to look like the base material.  Reading sign makers forums this leads inevitably to vinyl paint mask such as Oracal Oramask.  Unfortunately that's not available locally and it's costly to have it sent to my address.  The good news is a decent substitute is available at Walmart.  If you live in North America one of these stores is probably nearby.  The product used in this post is a removable adhesive covering and the brand name Con-Tact The most common use of this product is probably keeping sticky/stainy items from ruining shelves.

    My usual poor photography on display again.  For example the thin white oval inside the Ford emblem is near razor sharp, not like the jagged thing you see here.
Here's a step-by-step of the globe-like item in the picture:
1) After sanding the plywood 2 coats of white oil-based enamel were applied. Good old Tremclad in the rattle-can.

2) Allow the paint to dry fully before applying the vinyl.  The directions aren't very specific about how to apply.  What worked best for me was lining up one edge and slowly peeling off the backing film while pressing the vinyl against the work.  Hurrying this process resulted in air bubbles, lots of them.  The 'arrow' part wasn't covered with vinyl.

3) Time to carve.  I used a sharp v-bit and cut without using the dust boot.  My thinking was the brush might lift the vinyl and I also didn't want the sticky adhesive on the brush.  The vinyl cut fairly clean and any fuzzies were trimmed with a utility knife blade.

4) Once the cutting/clean-up was complete another coat of white Tremclad was applied.  This way if any paint was to seep beneath the vinyl it wouldn't be noticeable in the final product.

5) After about an hour it was time to spray the blue.  Oil-based enamel,  Ford Blue if you haven't already guessed.

6) Now it's time to carefully remove the mask to expose the white beneath, a razor and a dental pick help here.  The blue paint was allowed to dry to the point where it was unlikely to smear but not nowhere near fully cured.  A few hours ?  It was a pretty thick coat.  If you wait too long before removing the mask it could bond permanently with the top coats of paint and make ragged edges.

7) There were some small traces of glue remaining on the white surface.  Paint thinner cleaned those up easily.  Alcohol would also work.  Probably best  to do this after all the paint is really well cured.

The globe-thingy is a model for a weathervane.  The finished item will be cut from pvc sheet instead of plywood.       

Making a toy truck

The beginnings of this toy can be found posted 5/31/18.  Much drawing and measuring went into this project but most of the time passed in waiting for the right free material and deciding how to make the tires. Now that most of the design details are settled it's time to buy some quality birch ply and build 2 more with decent materials.  I hope to document the process in an upcoming post.


Friday 28 September 2018

Half tone cnc

Need something to decorate your cnc workspace ?
Here's something simple that only needs a bit of flat material and whatever paint/stain you have on hand.
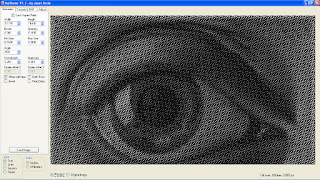
 On the left is M.C. Escher's "Eye".  The item to the right is a reproduction of the sexiest automobile ever produced (in my biased opinion).  The eye is a piece of varnished ply,  spray painted black before carving.  The Jaguar is a piece of shelving veneered with white melamine, blackboard paint fills in the dots.  Both were cut with a 90 degree v-bit.

The effect created is hard to photograph,  easier to explain.  Up close it's pattern of dots,  at a distance the dots become an indistinguishable part of the image.  These work best outdoors or in a large room.  Inch size dots on a building size canvas would be an awesome display. 

The software used is full of features and at the same  time simple enough to be self-explanatory.  Thank you Jason Dorie,  here's the link:
http://jasondorie.com/page_cnc.html


Friday 14 September 2018

Edge Lit LED Engravings

The material used is 3/8" cast acrylic from an unknown manufacturer.  Other plastics may also work but cast cuts nicely and the  thicker material adds visual depth.

The dxf file can be found here:
http://s3.cnccookbook.com/free-dxf-files-vehicles.html
Screenshot from Fusion 360
The cutting file was created in Fusion 360.  The original dxf file was edited to  contour around the top of the car.  The contour was cut with a 1/4" 2 flute end mill. The etching was done with a 'trace' toolpath using a 90 degree v-bit cutter at 0.012" depth.  A depth of 0.006" or 0.008" would have created finer detail making tidier work of the CAMARO text.  Notice the text (and the car) are a mirror image because the engraving is on the 'back side',  or in other words the display side is an uncut surface.
The Lotus Bloom engraving was a test cut.  It's the top of a laminar fountain nozzle which may be described in a future blog entry.

The LED lights are cut off a spool of strip lighting commonly found on EBay or Amazon.  A two section piece can be seen in front of the Camaro in the photo below.
Bad photo background,  what looks like dirt or scratches is really the dust shoe brush on my router.  The power is supplied by a 12V wall wart.  The 4 position switch was salvaged from a multi-function flashlight.  The colors available with this switch are red, green and white. (Is white a color?).
 

Friday 15 June 2018

Nearly free tramming bar

the black object protruding from the bar is a common dial test accessory

checking perpendicularity, more commonly known as tramming  
A very simple tool to check that a spindle is perpendicular to a surface.  Also used to find the centre of an object, especially useful  for round objects. The tools used here are a dial indicator and a dial test indicator.

Materials:
A piece of hardwood
A 1/4-20 bolt with the head removed
A 1/4-20 wing nut
A 1/4-20 nut & bolt to fasten the dial indicator

Why 1/4" bolts? It's a common router collet size and also fits the mounting hole on most cheap dial indicators.
finding the centre of a circular object      

This tram bar was built without much effort towards being square or accurate.
It's for comparative measurement so as long as it's repeatable it's good enough. For the same reason the cheapest of indicators should work as well as pricey units.  In a pinch a bent piece of rod and feeler gauges can replace this whole apparatus

Wednesday 13 June 2018

$2 Router Table Clamps

This project is cheap fun assuming you have available scrap or scrounging skills.
The original idea was spotted on Thingiverse,  here's the link:
https://www.thingiverse.com/thing:776 

Materials used:
1/2" birch plywood https://www.menards.com/main/building-materials/panel-products/specialty-panels/hardwood-panels/1-2-x-20-23-x-20-23-c2-russian-birch-plywood/1254000/p-1452209920854.htm

3/4" hardwood dowel (to make the pivots)
1/4-20 threaded rod
1/4-20 nuts
1/8" hardwood plywood (to make the nut retainers)
1/8" HDPE sheet (to make the plastic washers)
A scrap piece of birch flooring (to make the knobs)
Woodglue

The knob in the centre of this image has a 1/4-20 nut embedded just slightly deeper than flush. The recess for the nut is a hexagon pocket cut with a 1/8" diameter bit which leaves a bit of material where there should 6 sharp corners, this provides a nice interference fit.  Barely visible leaning against the knob is a wooden washer,  this will be glued to the knob to act as a nut retainer.  To the right of the knob is a threaded rod and an "E-Z LOK" threaded insert.  The inserts have been installed from the underside of the table surface.  Every hole seen in the table above has a threaded insert installed.

 An exploded view.  The wooden washer is glued to the knob to act as a nut retainer.  In practice the nut may fit tight enough in the knob to make the retainer unnecessary.  If the knob is hardwood (I used birch hardwood) the knob itself could be tapped for threads eliminating the nut.  The pivot has been milled to provide a flat surface, this increases the holding power of the knob assembly.

WARNING: These clamps will collide with the router if you get too close.  For added clearance a bolt can replace the threaded rod and knob.

Thursday 31 May 2018

hand trace to gcode

hard to measure slopes and curves
Update: Fusion 360 has improved spline sketching since this blog post was created

Anyone reading a CNC blog will be familiar with creating a drawing in CAD but what if the aim is to reproduce an item that's difficult to define with a few caliper measurements ? The picture on the left is part of a toy truck.

It's possible to trace the photo itself in software.  It's also possible place a 3D object on a flat bed scanner.  In this example a quick trace was was done with fine tip marker.  The trace was placed on the scanner and the resulting b+w image opened in Inkscape
vector graphic on left, imported scan on right

Inkscape can autotrace a bitmap but the idea was to improve the original felt marker trace.  Use the bezier tool in spiro path mode to make the trace,  left mouse clicks create nodes and dragging creates the lines/curves.  The fewer the nodes the smoother the curves.  It may take a bit of practice to get a feel for the process.  When satisfied with the result drag the vector trace to the side and save (export) as a dxf file.

The dxf can be imported into CAM software to create the gcode file.  Fusion 360 was used for CAM.  As mentioned earlier the digital camera image can be imported directly into Fusion for tracing,  I am simply more comfortable with the Inkscape tracing features.  The picture below is a test cut done in a piece of scrap.
pictures or it didn't happen
  A sharp eye will notice the reproduction varies a bit from the original.  It was an attempt  at a beefier look in the handle area.

Sunday 29 April 2018

the whittler machine

This blog isn't dedicated to building machinery, other websites and blogs do that much better than I could ever accomplish.  Included here is a short description of one of my DIY builds.  This machine is a fixed gantry cnc router based on other designs but not a copy.


A look beneath the skin
It's dirty but looks just as crude clean

press fits to avoid welds

gantry carriage in Fusion 360

The travels  are 32" x 18.5" x 7.5"